Whiteout Survival Chief Gear Guide: Upgrade Order & Priority Explained
The complete Whiteout Survival chief gear guide: the six gear slots, quality tiers from Uncommon to Legendary, forging, material costs, and the upgrade order that unlocks set bonuses fastest.
Chief gear is the one progression system in Whiteout Survival that boosts your entire account at once instead of a single hero or troop type, which is exactly why getting the upgrade order wrong costs you more than it does anywhere else. Six equipment pieces, five quality tiers, and a set-bonus system that punishes uneven investment make chief gear feel more complicated than it needs to be. This guide covers the full picture: which pieces to upgrade first and why, how the Uncommon-to-Legendary tier ladder actually works, what forging does once you reach Mythic quality, and what the material costs look like along the way.
Quick Answer: Chief Gear Upgrade Order
If you only take one thing from this guide, it's this: upgrade all six pieces together, tier by tier, in Infantry, Marksman, Lancer order, rather than pushing any single slot ahead of the rest.
| Priority | Gear pieces | Troop class | Why this order |
|---|---|---|---|
| 1 | Coat, Pants | Infantry | Infantry holds the frontline and absorbs the most damage, so early defense and attack gains here protect your whole army the most |
| 2 | Ring, Weapon | Marksman | Backline damage output benefits most once your frontline can hold |
| 3 | Cap, Watch | Lancer | Lancers take the least direct damage, making their gear the lowest-impact slot to fall slightly behind |
This priority order applies inside every quality-tier cycle, not just once. Bring all six pieces through Uncommon together, then Rare, then Epic, and so on, following Infantry then Marksman then Lancer within each pass, rather than rushing one piece all the way to Legendary while the rest sit behind. Small gaps within a tier are fine. Large gaps cost you set bonuses.
The Six Chief Gear Slots
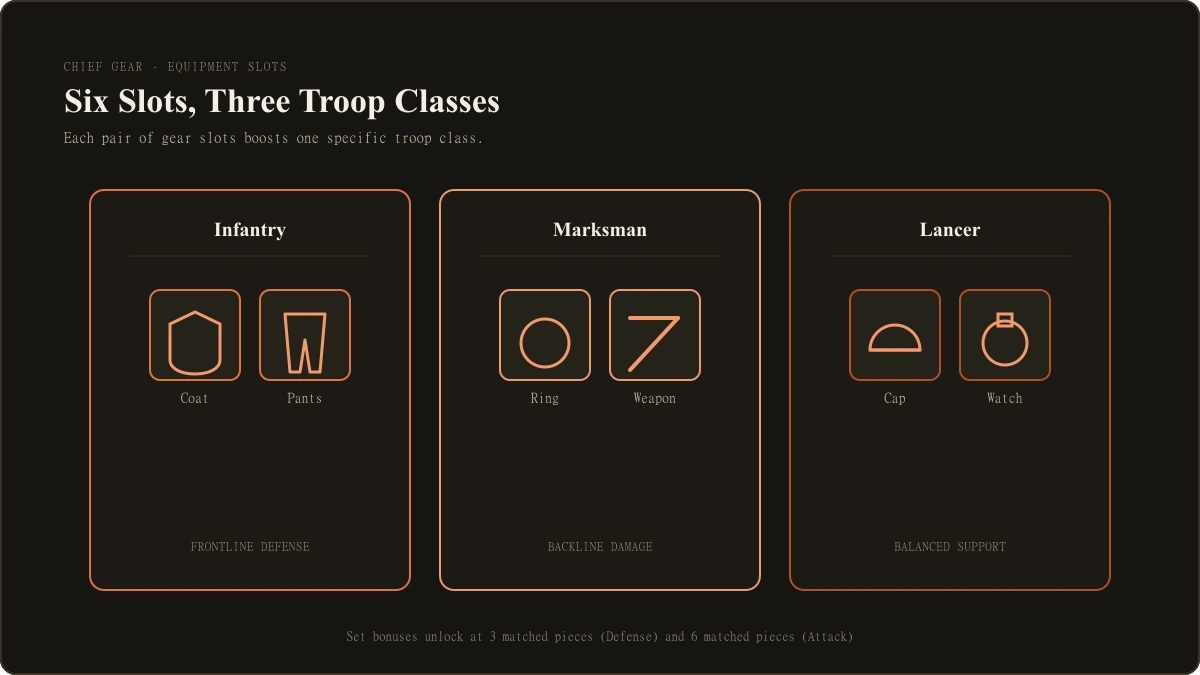
Chief gear is separate from hero gear. It equips directly on your chief and applies its bonuses account-wide rather than to a single hero, and it's built around the same three troop classes covered in our heroes guide: Infantry, Lancer, and Marksman.
| Slot | Troop class boosted | Stats affected |
|---|---|---|
| Coat | Infantry | Attack and Defense |
| Pants | Infantry | Attack and Defense |
| Ring | Marksman | Attack and Defense |
| Weapon | Marksman | Attack and Defense |
| Cap | Lancer | Attack and Defense |
| Watch | Lancer | Attack and Defense |
Each piece is crafted individually and then upgraded through the same quality-tier ladder, using materials shared across all six slots. That shared material pool is exactly why upgrade order matters: every piece you push ahead of schedule is materials another piece isn't getting.
Gear Quality Tiers Explained
Every chief gear piece climbs through the same five quality tiers, cross-checked across multiple sources, with sub-tier levels inside the higher tiers that extend progression well past a simple five-step ladder.
| Tier | Common name | Position |
|---|---|---|
| 1 | Uncommon (Green) | Starting quality after crafting |
| 2 | Rare (Blue) | First major material step-up, Design Plans become relevant here |
| 3 | Epic (Purple) | Mid-game tier, meaningful stat jump |
| 4 | Mythic (Gold) | Endgame tier with internal sub-levels (T1, T2, and beyond) and where Forging Level becomes relevant |
| 5 | Legendary (Red) | Top tier, reached by forging Mythic gear, with its own sub-tiers extending well beyond the base Legendary rank |
Within each tier, gear also progresses through star levels before it's eligible to advance to the next quality tier, and the Mythic and Legendary tiers add numbered sub-tiers (T1, T2, and further) on top of that. Sources checked for this guide agree on the overall structure and ordering but differ on exactly how many sub-tiers exist at the Legendary level, so treat the ladder above as the reliable framework and check your own in-game upgrade screen for the current maximum tier available to you.
Upgrade Order: Why Infantry, Then Marksman, Then Lancer
The Infantry-first, Marksman-second, Lancer-third order shows up consistently across every source checked for this guide, and the reasoning holds up mechanically rather than being an arbitrary convention.
Infantry troops and heroes sit on the frontline and absorb the bulk of incoming damage in both PvP rallies and PvE content. Upgrading Coat and Pants first means your whole formation survives longer before Marksman and Lancer gear even becomes relevant, since a formation that loses its frontline early rarely gets to use its backline damage anyway. Marksman gear comes second because Ring and Weapon upgrades translate directly into backline damage output, which matters once your frontline can actually hold a fight open long enough for that damage to land. Lancer gear comes last not because Lancers don't matter, but because they take comparatively less direct damage and their gear has the smallest marginal impact on whether a fight is won or lost early.
This order applies as a repeating cycle, not a one-time sequence. Every time you push into a new quality tier, work through Infantry, then Marksman, then Lancer again before moving any piece into the next tier beyond that.
The Balanced-Upgrade Rule and Set Bonuses
Chief gear's set bonus system is the actual mechanical reason balanced upgrading beats stacking one piece. Equipping multiple pieces at the same quality tier unlocks bonuses that apply to your whole army, not just the troop class tied to those specific slots.
| Pieces equipped at matching quality | Bonus type | Applies to |
|---|---|---|
| 3 pieces | Defense bonus | All three troop types |
| 6 pieces (full set) | Attack bonus | All three troop types |
Sources checked for this guide consistently describe these two thresholds and confirm the bonus percentage scales with the quality tier the set is matched at, but none of them published a specific, verifiable percentage figure for any given tier. Treat the set bonus as real and significant, worth planning around, rather than assuming a specific number without checking your own in-game gear screen.
The practical implication: a chief with all six pieces at Epic quality generally outperforms a chief with three pieces rushed to Mythic and three pieces still sitting at Uncommon, because the second chief is missing both set bonuses entirely. Keep your six pieces within a tier or two of each other at all times.
Forging: How Mythic Gear Becomes Legendary
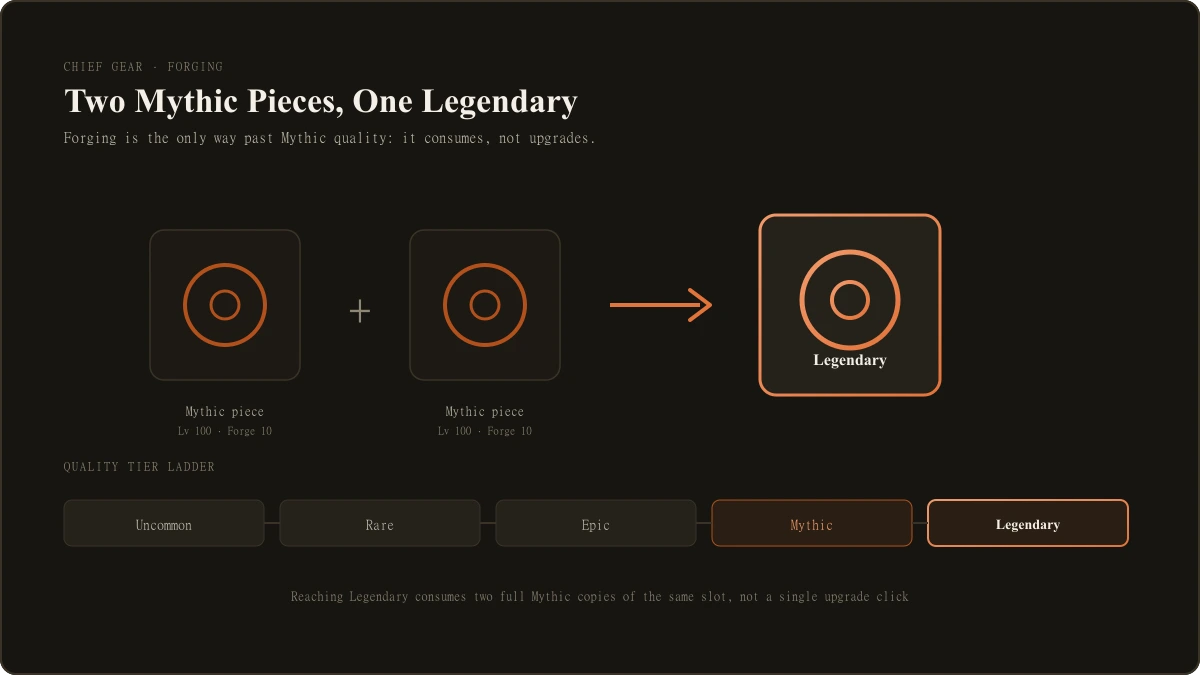
Legendary quality isn't reached through a normal upgrade click the way earlier tiers are. Based on the clearest source found for this guide, a Mythic piece needs to reach Level 100 and Forging Level 10 before it becomes eligible, at which point you consume two identical Mythic pieces of that same slot to produce one Legendary piece.
That mechanic has two direct consequences worth planning around. First, reaching Legendary on a single slot effectively requires building two full Mythic-quality copies of that piece, which roughly doubles the material investment compared to a normal single-piece upgrade. Second, because Legendary is reached by consuming duplicates rather than by upgrading in place, it's worth deliberately overbuilding one slot's Mythic materials ahead of pushing that slot to Legendary, rather than discovering mid-upgrade that you need a second full copy you haven't started.
This forging step was described consistently in the sources checked for this guide, though the level of detail on the exact forging-level requirements varied, so treat the Level 100 and Forging Level 10 thresholds as the best available answer rather than an official, independently reconfirmed number, and check your own gear screen once you're approaching Mythic completion.
Separately, at least one source notes that an Enhancement Material Exchange feature unlocks once a piece reaches Mythic Tier 2 with 3 stars, letting you convert excess materials you've overproduced into whichever material you're actually short on. That's worth checking for on your account once you reach that point, since it changes how tightly you need to plan material farming around each specific resource.
Materials You Need and Where to Get Them
Four materials gate chief gear progression, and they don't all become relevant at the same time.
| Material | Introduced at | Role |
|---|---|---|
| Hardened Alloy | Uncommon tier (earliest upgrades) | The core material for nearly every upgrade step, common early and increasingly scarce at higher tiers |
| Polishing Solution | Uncommon tier | Used alongside Hardened Alloy from the start; several sources describe it as the first real bottleneck new players hit |
| Design Plans | Rare tier onward | Becomes necessary once pieces start pushing into and through Epic quality |
| Lunar Amber | Legendary tier only | The scarcest material by far, event-dependent and worth saving deliberately rather than spending as it arrives |
All four materials can be earned through a mix of recurring events and shops rather than any single guaranteed source, which is part of why chief gear progression and event participation are linked rather than separate goals in Whiteout Survival.
| Source | What it provides |
|---|---|
| Bear Trap | A widely cited top source of gear materials and hero resources from personal and alliance rewards |
| Crazy Joe | Purchasable materials including Hardened Alloy and Polishing Solution |
| Alliance Championship Shop | A steady, dependable source with daily purchase limits, including higher-tier materials |
| Frostfire Mine | Ranking-based rewards that include gear materials |
| Foundry Shop | Stocks chief gear materials in exchange for Arsenal Tokens |
| King of Icefield and beast hunts | Additional sources cited for Hardened Alloy and higher-tier materials like Lunar Amber |
Because Lunar Amber only becomes relevant once you're pushing into Legendary quality, there's little reason to worry about farming it until your Mythic pieces are close to forging-ready. Spend your early sessions prioritizing Hardened Alloy and Polishing Solution instead.
What Chief Gear Upgrades Actually Cost
Exact material costs vary between sources, and none of the guides checked for this article agree closely enough on specific numbers to treat any single figure as confirmed. What's consistent is the shape of the cost curve: early upgrades are cheap, and costs climb sharply by the time you reach Legendary tiers.
| Stage | Hardened Alloy (approximate, source-cited) | Notes |
|---|---|---|
| First upgrade (Uncommon to Rare) | Roughly 1,200 to 1,500 per source checked | Cited figures for this exact step differ by source; treat as an order-of-magnitude estimate, not a fixed number |
| Rare to Epic | Roughly 4,800, plus several hundred Polishing Solution | One detailed source's figure; not independently confirmed by a second |
| Epic to Mythic | Roughly 18,000 to 18,500, plus over 1,000 Polishing Solution | Cited consistently in scale, if not in exact digits, across sources |
| Late Legendary sub-tiers | Cited as high as 86,000 Hardened Alloy plus roughly 1,000 Polishing Solution, 180 Design Plans, and 25 Lunar Amber for a single step | Sourced from one detailed cost breakdown; the direction (very high) is corroborated elsewhere, the exact figure is not |
Treat every number above as illustrative rather than authoritative. Whiteout Survival's actual costs are shown directly on your in-game upgrade screen and are the only figure worth planning a real farming schedule around. What these figures are useful for is expectation-setting: the jump from early to late tiers is not linear, it's closer to exponential, which is exactly why balanced upgrading across all six pieces (rather than rushing one piece to Legendary) keeps your account's overall combat power climbing steadily instead of stalling out on a single overextended slot.
Common Chief Gear Mistakes
| Mistake | Why it costs you | The fix |
|---|---|---|
| Maxing one gear piece before touching the others | You lose both the 3-piece and 6-piece set bonuses, which apply to your whole army | Keep all six pieces within a tier or two of each other at all times |
| Upgrading Lancer gear before Infantry or Marksman | Lancer gear has the smallest impact on whether your frontline holds or your backline deals damage | Follow Infantry, then Marksman, then Lancer within every tier cycle |
| Spending Lunar Amber before reaching Legendary-relevant pieces | Lunar Amber is the scarcest material and only matters once gear is forging-ready | Save Lunar Amber and prioritize Hardened Alloy and Polishing Solution during earlier tiers |
| Pushing a single piece to Legendary without a second Mythic copy ready | Forging to Legendary consumes two identical Mythic pieces, roughly doubling that slot's material cost | Plan to overbuild Mythic materials for a slot before starting its Legendary push |
| Ignoring events because gear materials seem like a small reward | Bear Trap, Crazy Joe, Frostfire Mine, and the Alliance Championship Shop are recurring, dependable material sources | Treat event participation as part of your gear progression plan, not a separate activity |
Chief Gear and Formation Power
Hero choice and troop class determine your formation's structure, but chief gear determines how much raw power that formation brings to an actual fight. Two accounts running an identical formation on paper will perform very differently if one has evenly upgraded chief gear across all six slots and the other doesn't. If a formation that looks strong on paper is underperforming, gear investment is worth checking before assuming the hero choices are wrong. Our best formation guide covers how to combine heroes into PvP and PvE lineups once your gear is pulling its weight.
Chief Gear Priorities for F2P Accounts
Free-to-play accounts face the same upgrade order and set-bonus math as spending accounts, just on a slower material timeline. The core adjustment is patience: resist the urge to rush one gear piece just because you happen to have a surplus of one material, and keep event participation consistent rather than sporadic, since events are the dependable free source for all four material types. Our F2P progression guide covers gem-saving priorities and gear-versus-hero spending tradeoffs in more depth for accounts managing a genuinely limited material budget.
Where Sources Disagree
Most of the mechanics in this guide were consistent across the six sources checked, but a few specific details varied enough to flag rather than quietly resolve.
Marksman slot names. This site's own Pillar guide and the Whiteout Survival Wiki both name the Marksman slots Ring and Weapon. Two other sources checked (BlueStacks and boostbot.org) instead name them Belt and Shortstaff. Both naming conventions clearly refer to the same two equipment slots, so this article follows this site's own already-established naming (Ring and Weapon) for consistency with the Pillar and the rest of this site's Whiteout Survival coverage, rather than switching terminology mid-site.
Mythic tier color name. Most sources checked call the Mythic tier "Gold." One source called the same tier "Orange." This is very likely the same in-game color rendered differently by different writers rather than a factual disagreement, and it doesn't affect the tier's position in the ladder, so this article uses "Gold" as the more commonly cited name.
Late-tier material naming. Most sources name the Legendary-tier material "Lunar Amber." One source instead referred to "Moonstones and Lunar Ember" for late Mythic and Legendary materials. Given the naming overlap and that no source fully reconciled the two, this article uses "Lunar Amber" as the majority-cited term and flags the alternate naming here rather than presenting either as certain.
Legendary sub-tier count. One detailed source lists Legendary sub-tiers running from T1 through T6. Another lists them stopping around T3. Neither source is clearly more authoritative than the other on this specific point, so this article describes Legendary as having multiple sub-tiers "extending well beyond the base rank" without committing to an exact maximum, and recommends checking the in-game gear screen for the current cap.
Exact upgrade costs. As covered in the costs section above, no two sources agreed closely on exact Hardened Alloy, Polishing Solution, Design Plans, or Lunar Amber figures for any given upgrade step. This article presents cost figures as source-cited examples rather than confirmed numbers, consistent with GLOBAL_RULES.md's standard against stating unverifiable specifics as fact.
What to Read Next
- For the mechanics behind troop classes and hero investment that chief gear complements, read our heroes guide.
- New chiefs who haven't finished their first two weeks yet should start with our beginner guide before diving into gear.
- Once your gear is contributing real power, build it into an actual lineup with our best formation guide.
- Free-to-play chiefs managing a limited material budget should read our dedicated F2P progression guide.
- For the full picture of how heroes, progression, gear, and events connect, start from our complete Whiteout Survival guide.

Ethan Cole is the Guides Editor at LootVora, covering game progression, builds, tier lists, resources, and strategy.