Best Valorant Settings 2026: High FPS, Low Latency & Competitive Visibility
Every recommended Valorant setting in one place for 2026: display and graphics, sensitivity basics, crosshair visibility, keybinds, and FPS/latency, with the reasoning and trade-offs behind each value.
There is no single settings file that works for every Valorant player, but there is a reliable set of starting points that competitive-settings research and publicly shared pro configurations converge on. This guide walks through every settings category that affects competitive play, display and graphics, sensitivity, crosshair, keybinds, and FPS and latency, with the recommended value and the reasoning behind it for each one. It's meant as a complete reference you can work through in order, not a replacement for the deeper guides on any single area.
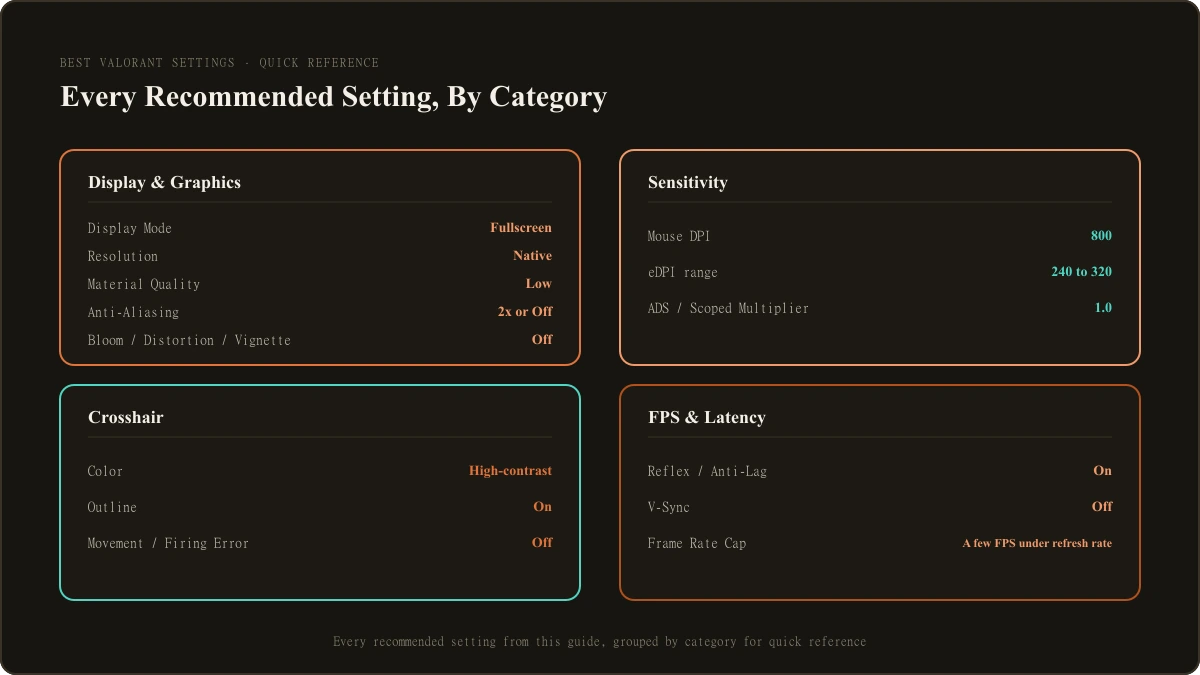
Quick Answer: Recommended Settings by Category
| Setting | Recommended value | Why it matters |
|---|---|---|
| Display Mode | Fullscreen | Gives the GPU exclusive access to the display, generally the lowest-latency option |
| Resolution | Native | Non-native resolutions introduce scaling artifacts without a real FPS gain on modern hardware |
| Material Quality | Low | The single graphics setting with the largest FPS impact on weaker GPUs |
| Anti-Aliasing | MSAA 2x, or Off | Trade-off between smoother edges and a small FPS cost; competitive players chasing maximum FPS often run it Off |
| Bloom, Distortion, Vignette, Cast Shadows | Off | Reduces visual noise around enemy models, a visibility choice more than a performance one |
| Mouse DPI | 800 | Common round number that most mice support natively and makes sensitivity math easy |
| In-game Sensitivity / eDPI | 0.3-0.4 at 800 DPI (roughly 240-320 eDPI) | Falls inside the range most tracked competitive players use, a reasonable starting anchor |
| ADS / Scoped Sensitivity Multiplier | 1.0 to start | Matches hipfire feel by default; only adjust after your base sensitivity feels settled |
| Crosshair color | High-contrast (cyan, green, or yellow) | Stands out more reliably than white or red against Valorant's generally warm-toned maps |
| Crosshair outline | On | Widely considered the single biggest crosshair visibility upgrade |
| Movement Error / Firing Error | Off | Keeps the crosshair a fixed size and shape, easier for most players to track precisely |
| NVIDIA Reflex (NVIDIA GPUs) or Radeon Anti-Lag (AMD GPUs) | On | Shortens the delay between an input and the frame reaching the screen, independent of your raw FPS number |
| V-Sync | Off | Prevents the frame buffering that adds input lag to sync with your monitor's refresh rate |
| Frame rate cap | A few FPS under your monitor's max refresh rate, or uncapped if Reflex manages pacing | Avoids GPU-bound queuing and tearing without V-Sync's latency cost |
The sections below explain the reasoning behind each row, and point you toward the deeper guide on any topic you want to go further into.
Display and Graphics Settings
Valorant was built to run well on modest hardware, so its graphics options affect competitive visibility more than they affect whether the game runs at all. A short list of choices covers most of what matters here.
| Setting | Recommended value | Why |
|---|---|---|
| Display Mode | Fullscreen | Exclusive GPU access to the display, generally the lowest-latency mode |
| Resolution | Native | Avoids scaling artifacts and looks sharper without meaningfully changing FPS on modern hardware |
| Material Quality | Low | Largest FPS impact of any graphics option, since High uses more expensive per-surface shading |
| Texture Quality | Medium | Minimal FPS cost either way; Medium avoids the visible pop-in some players notice on Low |
| Detail Quality | Low | Reduces background clutter like foliage that can visually hide enemies |
| Bloom | Off | Cuts down light-glow effects that can wash out enemy silhouettes in bright areas |
| Distortion | Off | Removes a heat-shimmer visual effect some players find distracting during utility use |
| Vignette | Off | Screen-edge darkening with no gameplay benefit, and it slightly reduces peripheral visibility |
| Cast Shadows | Off or Low | Genuine preference call; shadows help depth perception for some, cost rendering time for others |
| Anti-Aliasing (MSAA) | 2x, or Off | 2x smooths edges at a small FPS cost; Off is common among players chasing maximum FPS |
These values reflect what current competitive-settings guides and publicly tracked pro configurations converge on, not an official Riot recommendation. If visual quality matters more to you than squeezing out a competitive edge, Bloom, Cast Shadows, and Distortion are reasonable to leave on, since Valorant's low baseline hardware requirements mean the cost is mostly reduced enemy visibility rather than lower FPS. For every remaining graphics option, defaults not listed here, and a full breakdown of what each one visually changes, see our complete graphics settings guide.
Sensitivity and Aim Settings
Sensitivity comes down to eDPI, your in-game sensitivity multiplied by your mouse DPI:
eDPI = in-game sensitivity x mouse DPI
According to ProSettings.net's tracking of professional Valorant players, average pro eDPI sits around 267 as of September 2026, with a median closer to 240, and most tracked pros fall between 200 and 350. VLR.gg's own analysis reaches a similar range and frames lower eDPI as common at the pro level because it rewards small, controlled aim over large, fast swings, which suits Valorant's headshot-focused gunplay. That range describes what a large sample of high-level players happen to use, not a rule.
A practical starting point: fix your DPI at a round number like 800, then set your in-game sensitivity somewhere between 0.3 and 0.4, which lands inside that common eDPI range. From there, adjust based on whether you consistently overshoot targets (lower it) or fall short on wide turns (raise it). Valorant also has separate ADS and Scoped Sensitivity Multipliers, both defaulting to 1.0 to match hipfire feel; most players leave both alone until their base sensitivity feels settled, then adjust the Scoped multiplier specifically if Operator, Outlaw, or Marshal aim feels inconsistent with hipfire.
This is the short version. For the full eDPI-to-cm/360 conversion formula, mousepad sizing guidance, and a step-by-step process for finding your own number rather than copying a pro's, see our full sensitivity and DPI guide.
Crosshair Settings
Valorant's default crosshair is a thick green cross with Movement Error and Firing Error both enabled, meaning it visibly expands while you strafe or fire. That's a useful training aid early on, but past the learning stage it becomes one more moving element to track mid-fight.
Three adjustments come up consistently across competitive-settings coverage:
- Color. High-contrast colors like cyan, green, or yellow tend to stand out more reliably against Valorant's generally warm-toned maps than white or red, which can blend into certain surfaces.
- Outline. Adding a dark outline around the crosshair lines is widely considered the single biggest visibility upgrade available, keeping it legible against both bright and dark backgrounds.
- Static behavior. Turning off Movement Error and Firing Error keeps the crosshair a fixed size and shape at all times, which most players find easier to track precisely, though some prefer the visual feedback the errors provide.
Crosshair size and thickness are more subjective than color or outline: a smaller crosshair covers less of a distant target, which helps precision, while a slightly larger one is easier to track quickly in close-range fights. Neither is objectively correct. For specific crosshair codes and full style breakdowns by playstyle, see our dedicated crosshair guide.
Keybinds
Valorant's default keybinds work fine out of the box, and nothing about them is broken. A handful of adjustments show up often enough in competitive-settings coverage to be worth knowing about even if you don't adopt every one of them.
| Bind | Default | Common adjustment | Why |
|---|---|---|---|
| Crouch | Left Ctrl | Some players move it to a more reachable key | Frequent use during peeks; comfort varies by hand size and keyboard layout |
| Jump | Space | Some players bind Mouse Wheel Down | Reduces finger movement between jump-related actions and aiming |
| Ability 1 / Ability 2 | Q / E | Some players use Mouse Buttons 4/5 if available | Keeps fingers closer to movement keys during ability use |
| Ability 3 / Ultimate | C / X | Varies widely by player | No dominant standard; publicly shared pro configurations differ meaningfully from each other here |
The wider point is that there's no single "correct" keybind layout. Publicly shared pro configurations disagree with each other often enough that keybind comfort reads as genuinely personal rather than something with one right answer. For the complete default keybind list and every commonly recommended rebind, see our full keybinds guide.
FPS, Latency, and Performance Settings
A few settings live outside the graphics menu and target frame rate and input responsiveness directly rather than visual quality.
NVIDIA Reflex, available on supported NVIDIA GPUs, tightens the render queue between your input and the frame reaching the screen. Per NVIDIA's own published materials, this reduces overall system latency independent of your raw FPS number, and the Boost option keeps the GPU at a higher clock state during CPU-bound moments for a bit more latency reduction, at the cost of extra power draw and heat. On AMD hardware, Radeon Anti-Lag, enabled in the AMD Software Adrenalin panel, targets the same underlying latency goal and works broadly without needing Valorant-specific developer support, unlike AMD's newer Anti-Lag 2, which requires per-game integration Valorant does not currently have.
V-Sync should generally stay off, both in Valorant's own graphics menu and at the driver level. It caps your frame rate to your monitor's refresh rate by buffering frames, which reduces screen tearing but adds measurable input lag in the process, the opposite of what competitive play wants.
Frame rate capping is the better tool for avoiding tearing without V-Sync's downside. A cap set a few FPS under your monitor's max refresh rate (roughly 230-238 FPS on a 240Hz monitor, for example) keeps your GPU from racing ahead of what the display can show. If Reflex or Anti-Lag is already managing your frame pacing, many players leave the rate uncapped instead and let that handle it.
This covers the baseline. If you're already running these settings and still seeing stutters or unexpected frame drops rather than a consistently low FPS, that's usually a background-process, overlay, or driver issue rather than something fixable through these settings alone. Our dedicated FPS and performance guide covers that diagnostic process, along with Windows power plan and driver-level settings, in depth.
Competitive Performance vs. Visual Quality: Know Which You're Optimizing For
Most of the recommendations above assume you're optimizing for competitive performance and enemy visibility, the more common goal for players searching for the best Valorant settings. That's a real trade-off, not a universal upgrade: turning off Bloom, Cast Shadows, Distortion, and running lower Material and Detail Quality makes enemies easier to spot at a glance, but it also makes the game look visually flatter than it's capable of looking. Since Valorant's baseline hardware requirements are low by competitive-shooter standards, most systems can run the richer visual settings without a meaningful FPS cost, so if you'd rather keep the fuller visual experience and only care about a stable frame rate, you can do that without touching most of the visibility-focused settings above. The one setting that isn't adjustable either way is field of view: Valorant fixes FOV at 103 degrees on a 16:9 display by design, so enemy positioning and recoil patterns look identical for every player regardless of monitor setup, there's no slider to look for.
Putting It Together
A reasonable order to work through this guide: confirm your hardware sits at or above Riot's recommended spec tier, set Display Mode to Fullscreen at native resolution, work through the graphics table above, set a starting sensitivity around 0.3-0.4 at 800 DPI and adjust from there, spend a few minutes on crosshair color and outline, enable Reflex or Anti-Lag depending on your GPU, and turn V-Sync off everywhere. Everything here is a starting point meant to be adjusted to your own hardware, monitor, and playstyle, not a fixed answer to copy exactly.
What to Read Next
This guide covers every settings category at a glance. For real depth on any one of them:
- For the eDPI formula, cm/360 conversion math, and mousepad sizing, read our full sensitivity and DPI guide.
- For specific crosshair codes and style breakdowns, read our dedicated crosshair guide.
- For every graphics option explained individually, read our complete graphics settings guide.
- For the complete default keybind list and every commonly recommended rebind, read our full keybinds guide.
- For diagnosing stutters, frame drops, and driver-level performance settings, read our dedicated FPS and performance guide.
- For specific named pro-player configurations rather than aggregate ranges, read our pro settings roundup.

Jordan Blake is the Game Settings Editor at LootVora, covering in-game settings, sensitivity, graphics, controls, keybinds, and performance.