Best Valorant Crosshair Settings 2026: Codes, Styles & Visibility
How Valorant's crosshair code system works, every customization option explained, and crosshair profiles built for precision, spray control, and sniper play, with practical advice on testing your crosshair before you commit to it.
Valorant's crosshair settings decide how easily you spot a head through smoke or foliage and how much of a target your crosshair covers before you even pull the trigger. There is no single crosshair that works for every monitor, resolution, and set of eyes, but the customization menu gives you enough control to build one that fits yours, and a built-in code system lets you save or share the result in seconds instead of re-entering a dozen values by hand. This guide covers how that code system works, every setting the menu exposes, and a few crosshair profiles built around playstyle rather than around copying one specific player's exact numbers.
Quick Answer: Common Crosshair Starting Points
| Setting | Common starting point | What it affects |
|---|---|---|
| Color | Cyan, green, or white | Contrast against enemy models and Valorant's generally warm-toned maps |
| Outlines | On, moderate opacity | Keeps the crosshair legible against both bright and dark backgrounds |
| Center Dot | Off to start | Adds a fixed aim reference at the cost of a little extra visual clutter; a personal preference either way |
| Inner Lines Length | 4 to 6 | Longer lines are quicker to find at a glance; shorter lines cover less of a distant target |
| Inner Lines Thickness | 1 to 2 | Thinner lines expose more of a target's head; thicker lines are easier to track during fast movement |
| Inner Lines Offset (Gap) | 1 to 3 | A smaller gap keeps the crosshair compact around the center; a larger gap opens a clearer window right where you aim |
| Outer Lines | Off | Most players find outer lines add clutter without a clear visibility benefit |
| Movement Error / Firing Error | Off | Keeps the crosshair a fixed size at all times, rather than expanding while you move or fire |
These are starting points drawn from common settings-guide consensus, not a single correct answer. The rest of this guide explains what each option actually changes and why the trade-offs go the way they do.
How Valorant's Crosshair Code System Works
Every crosshair setting in Valorant, from color down to individual line offsets, compresses into a single code you can copy, paste, and share. Riot added this system in Patch 4.05, describing it in its own patch notes as the "ability to import and export different crosshair settings via auto-generated codes." The same patch also split crosshair customization into separate profiles for your primary hipfire crosshair, your aim-down-sights (ADS) crosshair, and your sniper scope crosshair, so changing one doesn't affect the others.
To export your current crosshair: open Settings, go to the Crosshair tab, and select the icon shaped like an arrow pointing up, next to Crosshair Profile. Your crosshair converts into a short code and copies to your clipboard automatically.
To import a code someone shared with you: open the same Crosshair tab and select the icon shaped like an arrow pointing down. Paste the code into the field provided and select Import. According to Riot's patch notes, the crosshair preview at the top of the settings menu updates immediately to reflect the imported values, so you can see exactly what you're about to apply before committing to it.
This system is genuinely useful for testing someone else's approach quickly, but a code only tells you the end result, not why those particular values were chosen. Pasting a code without understanding what each part of it does often produces a crosshair that doesn't actually suit your own monitor size, resolution, or color perception, which is why the option-by-option breakdown below matters even if you plan to import rather than build from scratch.
Every Crosshair Setting, Explained
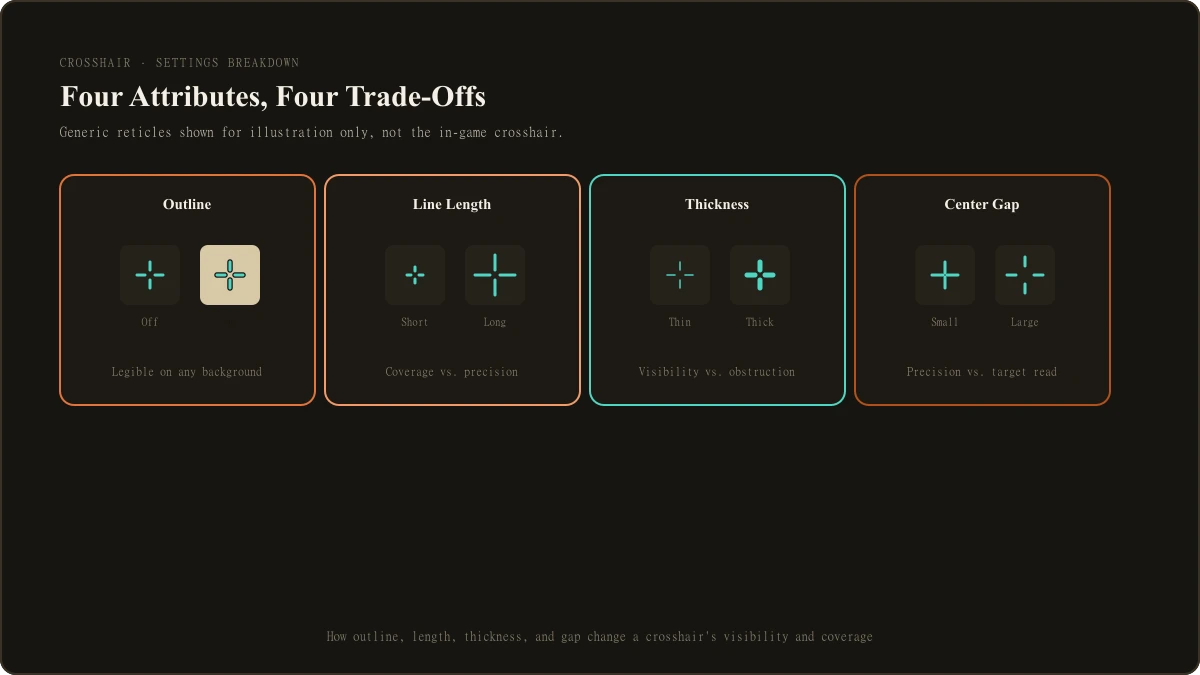
Valorant's crosshair menu is organized into a handful of groups: general options that apply to the whole crosshair, Inner Lines, Outer Lines, and the separate ADS and Sniper Scope profiles.
| Setting group | What it controls | Why it matters |
|---|---|---|
| Color | The overall color of your crosshair | High-contrast colors (cyan, green, white) stand out more reliably across Valorant's mostly warm map palette than red or muted tones, which can blend into certain surfaces |
| Outlines | A dark edge drawn around every crosshair element, with its own opacity and thickness | Keeps the crosshair readable against both bright surfaces and dark shadows at once; opinions vary on exact thickness, but leaving outlines on entirely is close to a universal recommendation |
| Center Dot | A small dot at the exact center, toggled on or off with its own opacity and thickness | A dot emphasizes a single precise aim point, useful for players who favor one-tap headshots; a cross without a dot gives a wider visual reference, useful for tracking targets during movement |
| Inner Lines | The primary four lines of the crosshair, with opacity, length, thickness, and offset (gap) each adjustable | This is the core shape most players actually see and aim with; length affects how quickly you find it, thickness affects how much of a target it covers, and gap affects how much clear space sits directly over your aim point |
| Outer Lines | A second, usually shorter set of lines further from center, with the same opacity, length, thickness, and offset options as Inner Lines | Rarely used; most players leave Outer Lines off since they mainly add extra clutter rather than useful information |
| Fade Crosshair with Firing Error / Show Movement Error | Two separate toggles that make the crosshair visibly expand while you fire or move | Functions as a built-in accuracy indicator for new players, showing when a shot is likely to miss; past the early learning stage, many players prefer a crosshair that stays a fixed size so it isn't one more moving element to track mid-fight |
| ADS Crosshair | A separate crosshair profile that only applies while aiming down sights on rifles and SMGs | Lets you run a different (often smaller or simpler) crosshair while zoomed than you use at hipfire |
| Sniper Scope Crosshair | A separate crosshair profile for the scope overlay on sniper rifles | Applies across every scoped weapon that shares a magnification tier, not per weapon individually, according to Pro Game Guides' breakdown of sniper crosshair settings, so tuning it once covers every sniper you pick up |
The length, thickness, and gap trade-off is worth understanding on its own, since it comes up in every crosshair discussion. A longer, thicker crosshair with a wide gap is easy to find at a glance and comfortable to track during fast movement, but it also covers more of a distant target, which works against precise headshots at range. A short, thin crosshair with a tight gap exposes more of the target underneath it, which favors precision, but it's a smaller visual target to locate quickly during a fast peek. Neither direction is objectively correct: it's a genuine trade-off between quick visual tracking and headshot precision, and which side you lean toward should follow your own playstyle rather than a fixed rule.
Crosshair Profiles for Different Playstyles
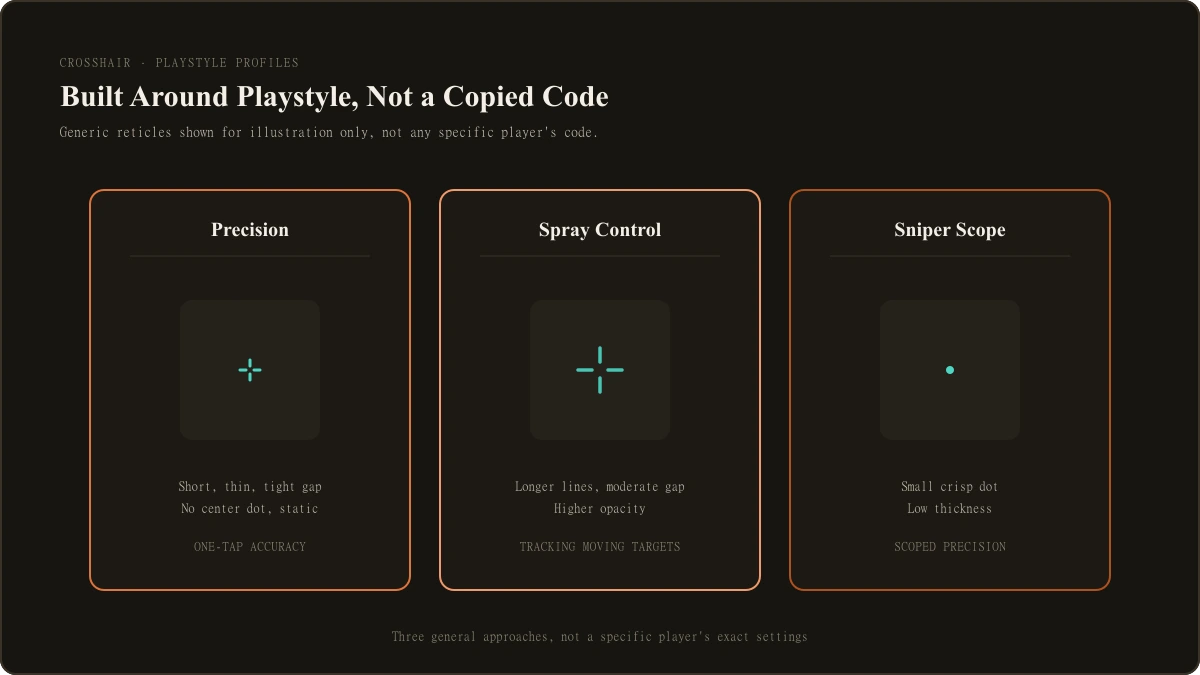
Rather than copying one specific player's exact code, it helps to think in terms of a small number of general profiles built around how you actually play. None of these are official Riot presets, they're descriptions of common approaches that show up repeatedly across competitive-settings guides.
Precision, one-tap style. A short, thin crosshair (or a dot-only crosshair with no cross at all), a tight gap, and both Movement Error and Firing Error disabled. This profile minimizes how much of a target's head the crosshair itself covers, which suits players who peek an angle already committed to a single precise shot rather than tracking a target through a longer exchange. The trade-off is that a very small, thin crosshair takes a fraction of a second longer to locate on screen during a fast, chaotic fight.
Spray control style. A slightly longer, more visible cross with a moderate gap and Inner Lines opacity left high. The extra visual presence gives you a clearer reference point for watching your own recoil pattern climb and correcting for it mid-spray, which matters more for players who hold angles and fight through sustained exchanges rather than committing to a single shot. This profile trades a small amount of headshot-hitbox precision for a crosshair that's easier to track continuously.
Sniper scope style. Configured separately through the Sniper Scope crosshair profile rather than the hipfire one, this is typically a small, crisp center dot with thickness kept low, generally in the 1 to 2 range, so it doesn't visually block a distant head inside a high-magnification scope. Since the Sniper Scope profile applies across every scoped weapon sharing that magnification tier rather than per weapon, this is a one-time setup rather than something to rebuild for each sniper rifle individually.
If you're curious what a specific named professional player currently runs rather than a style description, our pro settings roundup tracks individual configurations and updates as rosters and personal setups change.
Testing Your Crosshair Before You Commit to It
A crosshair that looks good in the settings preview doesn't always hold up in an actual match, which is why testing it properly matters more than picking the "right" numbers on the first try.
- Use the Practice Range at multiple distances. Test against the stationary and moving bot targets both up close and at long range, since a crosshair that feels precise at close range can feel oversized or hard to place accurately once a target is far away.
- Test on more than one map. According to ProSettings.net, contrast is a big part of why color matters here, and Valorant's maps don't share one consistent color palette; a crosshair that pops against Bind's warm sandstone can read differently against Icebox's cooler tones. If a color choice only gets tested on one map, it's an incomplete test.
- Play a few deathmatch or unranked games before judging it. A stationary Practice Range target doesn't replicate real peek timing, adrenaline, or an opponent shooting back, all of which change how a crosshair actually feels to use under pressure.
- Don't change your crosshair minutes before a ranked match. Give any new configuration at least a session or two before deciding whether it's actually an improvement, the same way a new sensitivity needs repetition before it settles into something you can judge fairly.
Common Mistakes
Running an oversized, thick crosshair. It's easy to find on screen, but it also visually swallows a distant target's head, working directly against precision at range.
Leaving outlines off. Outlines are close to a universal recommendation across competitive-settings guides because they keep the crosshair readable against both bright and dark backgrounds at once. Skipping them saves nothing meaningful and costs visibility in specific lighting.
Copying a code without understanding it. A crosshair code compresses someone else's monitor size, resolution, and personal color perception into a string of values built for their setup. Importing it wholesale can still be a fine starting point, but treating the result as final without testing it yourself skips the part that actually determines whether it works for you.
Forgetting the ADS and Sniper Scope profiles exist. Since Patch 4.05 split these out as separate, independently savable profiles, it's easy to tune a hipfire crosshair carefully and never touch the other two, leaving them on whatever default was there before.
Chasing visual perfection over functional testing. A crosshair that looks clean in the settings preview but has never been tested against a moving target at range is an untested crosshair, regardless of how deliberately its color and shape were chosen.
What to Read Next
This guide covers crosshair customization in depth. From here:
- For the mouse sensitivity and DPI math that pairs with a stable crosshair, read our sensitivity and DPI guide.
- For the complete settings walkthrough covering sensitivity, graphics, and keybinds alongside crosshair, read our complete best settings breakdown.
- For a specific named pro player's current, sourced crosshair code rather than a style description, read our pro settings roundup.
- For graphics options like Bloom and Cast Shadows that also affect how visible your crosshair and enemies are against the background, read our complete graphics settings guide.

Jordan Blake is the Game Settings Editor at LootVora, covering in-game settings, sensitivity, graphics, controls, keybinds, and performance.