Best Valorant Sensitivity 2026: DPI, Aim & ADS Settings Explained
How to find your best Valorant sensitivity in 2026: the eDPI formula, cm/360 conversion, mousepad sizing, ADS and scoped sensitivity for Operator, Outlaw, and Marshal, and the mistakes that keep your aim inconsistent.
Valorant sensitivity comes down to one number that actually matters: eDPI, your in-game sensitivity multiplied by your mouse DPI. Most competitive players land somewhere between 200 and 400 eDPI, with the tracked pro average sitting closer to 260, but the "right" number for you depends on your mousepad size, your monitor, and how your arm naturally moves a mouse. This guide covers the formulas, the conversion math, and the step-by-step process for finding your own number instead of copying someone else's.
Quick Answer: Starting Points for Valorant Sensitivity
| Setting | Common starting point | What it depends on |
|---|---|---|
| Mouse DPI | 800 | A common round number that makes in-game sensitivity math easy; most mice support it natively |
| In-game Sensitivity | 0.3 to 0.4 at 800 DPI | Yields an eDPI in the 240 to 320 range, a reasonable anchor for a first attempt |
| eDPI | 200 to 400, broad usable range | Mousepad size, monitor size, grip style, and arm movement preference |
| cm/360 | 30 to 50 cm | Physical desk space, mousepad size, and whether you prefer wrist or arm aiming |
| ADS Sensitivity Multiplier | 1.0 to start | Whether zoomed aim on rifles/SMGs feels consistent with hipfire |
| Scoped Sensitivity Multiplier | 0.97 to 1.0 to start | How often you play Operator, Outlaw, or Marshal, and whether you overshoot or undershoot while scoped |
These are starting points, not fixed answers. The rest of this guide explains the math behind each one and how to adjust from there.
The eDPI Formula and Why It Matters
eDPI (effective DPI) is the number that actually describes how fast your aim moves, independent of your specific mouse or in-game sensitivity value:
eDPI = in-game sensitivity x mouse DPI
A player running 0.4 sensitivity at 800 DPI has the same eDPI, and therefore the same actual aim speed, as a player running 0.2 sensitivity at 1600 DPI. Both equal 320 eDPI. This is why eDPI, not raw sensitivity, is the number worth comparing between players or between games: raw sensitivity numbers alone are meaningless without knowing the DPI they were paired with.
According to ProSettings.net's tracking of Valorant professional players, average pro eDPI sits around 267 as of September 2026, with a median closer to 240, and the majority of tracked pros fall between 200 and 350. VLR.gg's own analysis of pro sensitivity settings reaches a similar range and frames lower eDPI as common at the pro level because it favors small, controlled wrist and arm movements over large, fast swings, which suits Valorant's headshot-focused gunplay. That range describes what a large sample of high-level players happen to use, not a rule you have to follow. If you want to see exactly what specific named pros currently run, our pro settings roundup tracks individual configurations rather than aggregate ranges.
Converting Sensitivity Between Games and Mice: cm/360
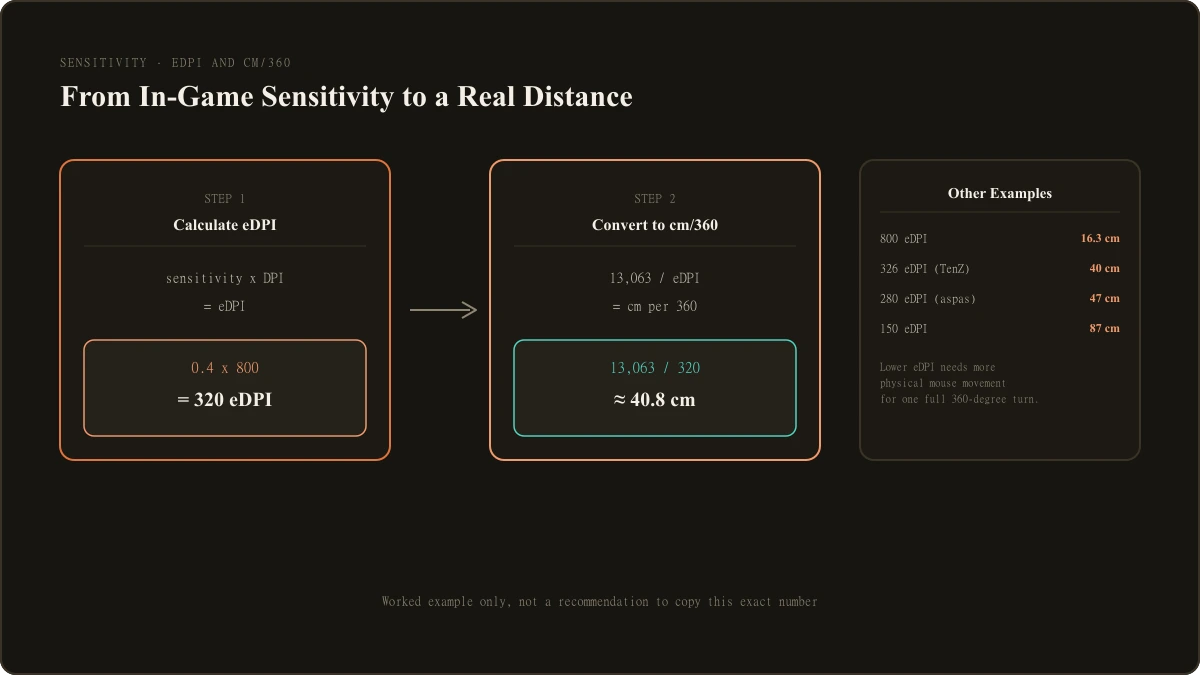
eDPI tells you your aim speed relative to itself, but it doesn't tell you how far your hand physically travels to turn around. That's what cm/360 measures: the physical distance, in centimeters, your mouse has to move across your desk to rotate a full 360 degrees in-game.
Valorant uses a fixed yaw constant of 0.07 degrees of camera rotation per mouse count, confirmed by independent sensitivity-conversion tools including MouseTester.io. The full formula is:
cm/360 = (DPI x sensitivity x 0.07) ... converted through 360 degrees x 2.54 cm
cm/360 = 914.4 / (DPI x sensitivity x 0.07)
Since eDPI already equals DPI multiplied by sensitivity, this simplifies to a shortcut worth memorizing:
cm/360 (approx.) = 13,063 / eDPI
A few worked examples show how this plays out in practice:
| eDPI | Approximate cm/360 | Feel |
|---|---|---|
| 800 | 16.3 cm | Very low sensitivity, large arm movement, high precision on flicks |
| 326 (TenZ's tracked config: 0.408 sens at 800 DPI) | 40 cm | Mid-low sensitivity, common among pros favoring precision |
| 280 (Aspas's tracked config: 0.35 sens at 800 DPI) | 47 cm | Mid sensitivity, still controlled but slightly faster |
| 150 | 87 cm | High sensitivity, small wrist movements, harder to control at range |
cm/360 is also the number to use when converting your sensitivity to a different game or a new mouse. Because every game has its own yaw constant, matching eDPI alone doesn't guarantee an identical feel across games, matching cm/360 does, since it describes actual physical hand movement rather than an in-game multiplier. Most sensitivity converter tools handle this calculation automatically once you enter your current game, sensitivity, and DPI.
Choosing a Mousepad Size for Your Sensitivity
Your cm/360 number determines how much physical desk space you need, which is the main reason mousepad size matters here at all. This isn't a hardware recommendation so much as a direct consequence of the sensitivity math above.
| Your cm/360 | Recommended mousepad width | Why |
|---|---|---|
| Under 25 cm | Standard or medium pad (roughly 320 to 360mm wide) | Low physical movement per turn, a compact pad rarely gets exhausted |
| 25 to 40 cm | Medium to large pad (roughly 400mm wide) | Comfortable middle ground for most desk setups |
| 40 cm and above | Large to XL pad (450mm wide or more) | Below this width, wide 180-degree turns risk running off the edge of the pad mid-swing |
Running out of mousepad space mid-turn forces you to lift and reposition your mouse, which breaks the consistency of a flick in progress. If you find yourself doing this regularly, either your cm/360 is higher than your current pad supports, or it's a sign your sensitivity may be lower than actually suits your desk space and arm comfort. Either direction is a legitimate fix, there's no single correct pad size independent of the sensitivity you land on.
How to Find Your Own Sensitivity: A Step-by-Step Method
Copying a pro's exact number skips the part that actually matters: whether it fits your desk, your grip, and your arm. This process gets you to a personal number in a few structured steps rather than by trial and error alone.
- Fix your DPI first. Pick a round number like 800 (the most common competitive default) and leave it alone. Adjusting in-game sensitivity is easier to fine-tune in small increments than DPI, which usually only offers fixed steps.
- Pick a starting eDPI inside the common range. Something between 240 and 320 is a reasonable anchor if you have no strong preference carried over from another game.
- Use the Practice Range or deathmatch to test flicks. Place your crosshair on a stationary point, then flick to a different target and stop. According to GameDesigning.org's breakdown of common aim issues, consistently overshooting the target means your sensitivity is too high; consistently falling short means it's too low.
- Adjust in one direction at a time. Change only sensitivity, not DPI, and only by small increments (0.02 to 0.05 at 800 DPI) so you can actually feel the difference between attempts.
- Test under real match pressure, not just practice mode. Aim feels different with adrenaline and real opponents reacting unpredictably. A sensitivity that feels perfect in an empty Practice Range can still feel too fast or too slow once you're peeking an angle with someone shooting back.
- Commit to a setting for at least a couple of weeks before changing it again. Muscle memory needs repetition to build. Constantly tweaking sensitivity session to session prevents your aim from ever settling into a consistent, trained feel, which is a more common problem than picking a slightly wrong number in the first place.
Once your hipfire sensitivity feels stable, move on to ADS and scoped sensitivity separately, since they don't automatically inherit the same feel.
ADS and Scoped Sensitivity Multipliers
Valorant separates hipfire sensitivity from two additional multipliers that apply only while aiming down sights.
ADS Sensitivity Multiplier applies to rifles and SMGs whenever you right-click to aim down sights. It defaults to 1.0, meaning zoomed sensitivity matches hipfire exactly, even though your field of view narrows slightly while scoped. Most players leave this at 1.0 and only adjust if ADS aim consistently feels faster or slower than their hipfire aim.
Scoped Sensitivity Multiplier applies only to the three sniper rifles: Operator, Outlaw, and Marshal. This is the one worth understanding in more depth, since the three weapons don't zoom identically. The Operator uses a dual-zoom scope with 2.5x and 5.0x levels, while the Outlaw and Marshal both use a fixed 3.5x zoom. A single Scoped Sensitivity Multiplier value applies across all three, so a multiplier tuned for comfortable Operator flicks at 5.0x zoom will feel noticeably different when you pick up a Marshal at its fixed 3.5x zoom, and vice versa. If you regularly swap between an Operator and a Marshal or Outlaw within the same match, expect a short adjustment period each time rather than assuming the multiplier will feel identical on both.
According to ProConfig.net's tracking of 113 professional players, 69 percent use a Scoped Sensitivity Multiplier of exactly 1.0, making it by far the dominant value. Among the minority who adjust it, lower values are more common than higher ones: about 6 percent use 0.9 and roughly 4 percent use 0.8, generally to prioritize controlled tracking and reduce overshoot on precise scoped flicks, while a smaller group runs 1.1 for slightly faster scope-to-scope reaction time.
Practical starting points if you play sniper roles often:
- If you consistently overshoot targets while scoped in, lower the multiplier toward 0.85 to 0.90.
- If scoped aim feels sluggish or slow to react compared to your hipfire speed, raise it toward 1.1 to 1.15.
- If you're not sure either way, 1.0 is a reasonable default that matches what most tracked pros actually use.
Common Mistakes When Setting Sensitivity
A few patterns come up repeatedly with players who struggle to settle on a sensitivity that actually works for them.
Sensitivity set too high. Symptoms include consistently overshooting targets, needing constant small corrective movements to settle on a headshot, and struggling specifically at long range where small mouse movements translate into large on-screen swings. High sensitivity can feel fast and exciting in the moment, but it trades away the fine control that headshot-focused gunfights actually reward.
Sensitivity set too low. Symptoms include running out of mousepad space mid-turn, needing large, slow arm sweeps to track a target, and struggling specifically in close-range fights where a fast 180-degree turn matters more than pinpoint long-range precision. Very low sensitivity favors precision at the cost of raw reaction speed.
Copying a pro's exact eDPI without matching context. A pro's number reflects their specific mousepad size, monitor size, grip style, and years of repetition with that exact feel. Borrowing the number without the surrounding setup often produces a sensitivity that doesn't actually fit your desk or hand.
Changing sensitivity too often. Switching settings every session, or mid-session after a few bad rounds, never gives muscle memory the repetition it needs to build. A slightly imperfect sensitivity used consistently usually outperforms a theoretically perfect one that changes weekly.
Treating ADS and Scoped multipliers as an afterthought. Since both default to 1.0 (matching hipfire), it's easy to never touch them and assume scoped aim will automatically feel right once hipfire does. For players who use the Operator, Outlaw, or Marshal regularly, the Scoped multiplier deserves its own separate testing pass rather than being left on default by default.
Blaming sensitivity for what's actually a performance problem. Stuttering, frame drops, or inconsistent frame pacing can feel like erratic aim even when your sensitivity is fine. If your aim feels inconsistent specifically during intense fights or high player counts rather than consistently at all times, our FPS and performance guide covers the troubleshooting steps for that separately.
What to Read Next
This guide covers the sensitivity math and methodology in depth. From here:
- For the complete settings walkthrough covering graphics, crosshair, and keybinds alongside sensitivity, read our complete best settings breakdown.
- For crosshair color, outline, and visibility choices that pair naturally with a stable sensitivity, read our dedicated crosshair guide.
- For specific named pro-player sensitivity configurations rather than aggregate ranges, read our pro settings roundup.
- If inconsistent aim traces back to frame drops rather than sensitivity itself, read our FPS and performance guide.
Jordan Blake is the Game Settings Editor at LootVora, covering in-game settings, sensitivity, graphics, controls, keybinds, and performance.